
前言
虽然说是week1-5的分享,但是,其实好玩的主要集中在week4 menory和week5 data-structures。前三章也不是说不好,只是我不太感兴趣而已。week3 Algorithms并没有什么算法的实现,只是三个模拟。(算法的真谛是大模拟)简单说说week4-5有什么好玩的。在这两章的Lab和Problem set可以实现读取wav文件并将音频声音变大、bmp图片的样式处理(包括变颜色、灰度化、棕褐色滤镜、水平镜像、模糊处理、边缘检测)、恢复jpg图片数据、反转wav音频、随机血型遗传模拟、拼写检查器。
volume
编写一个程序来修改音频文件的音量。
WAV文件
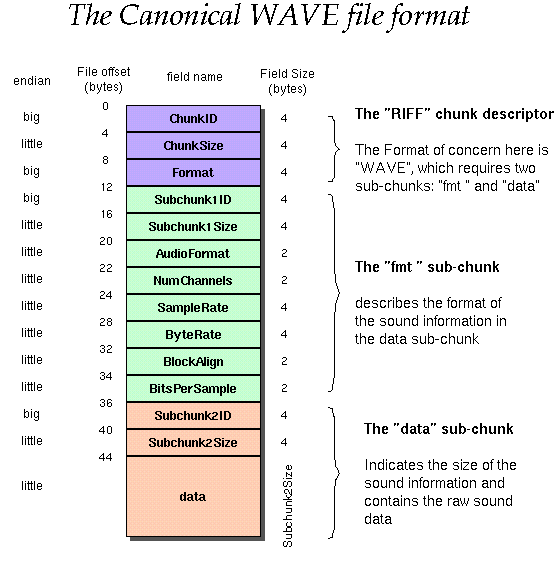
WAV文件是表示音频的常用文件格式。WAV文件将音频存储为一系列“样本”:代表特定时间点上某个音频信号值的数字。WAV文件以一个44字节的“头文件”开始,其中包含有关文件本身的信息,包括文件大小、每秒样本数和每个样本的大小。在头文件之后,WAV文件包含一系列样本,每个样本是一个单独的2字节(16位)整数,代表特定时间点上的音频信号。
通过给定的因子缩放每个样本值可以改变音频的音量。例如,将每个样本值乘以2.0,将使原始音频的音量翻倍。同时,将每个样本乘以0.5,将使音量减半。
到目前为止,我们已经在C语言中看到了许多不同类型的数据,包括int、bool、char、double、float和long。在名为stdint.h的头文件中,声明了许多其他类型,这些类型允许我们非常精确地定义整数的大小(以位为单位)和符号(有符号或无符号)。在这个实验中,有两种类型特别有用。
uint8_t是一种存储8位无符号(即非负)整数的类型。我们可以将WAV文件头的每个字节视为uint8_t值。int16_t是一种存储16位有符号(即正或负)整数的类型。我们可以将WAV文件中的每个音频样本视为int16_t值。
// Modifies the volume of an audio file

#include <stdint.h>
#include <stdio.h>
#include <stdlib.h>

// 这个就是文件读写

// Number of bytes in .wav header
const int HEADER_SIZE = 44;

int main(int argc, char *argv[])
{
    // Check command-line arguments
    if (argc != 4)
    {
        printf("Usage: ./volume input.wav output.wav factor\n");
        return 1;
    }

    // Open files and determine scaling factor
    FILE *input = fopen(argv[1], "rb");
    if (input == NULL)
    {
        printf("Could not open file.\n");
        return 1;
    }

    FILE *output = fopen(argv[2], "wb");
    if (output == NULL)
    {
        printf("Could not open file.\n");
        return 1;
    }

    float factor = atof(argv[3]);

    // TODO: Copy header from input file to output file
    uint8_t header[HEADER_SIZE];
    // Your program should first read the header from the input file and write the header to the output file. Recall that this header is always exactly 44 bytes long.
    fread(header, sizeof(uint8_t), HEADER_SIZE, input);
    fwrite(header, sizeof(uint8_t), HEADER_SIZE, output);

    // TODO: Read samples from input file and write updated data to output file
    int16_t buffer;
    while (fread(&buffer, sizeof(int16_t), 1, input))
    {
        // factor is the amount by which the volume of the original audio file should be scaled
        buffer *= factor;
        fwrite(&buffer, sizeof(int16_t), 1, output);
    }
    // Close files
    fclose(input);
    fclose(output);
}
编译好后,输入
./volume input.wav output.wav 2.0
即可运行
好玩
helpers
实现一个程序,根据以下要求将过滤器应用于BMP文件。
图像过滤
过滤图像到底意味着什么?你可以将过滤图像视为采取一些原始图像的像素,并以某种方式修改每个像素,使得在结果图像中出现特定的效果。
位图
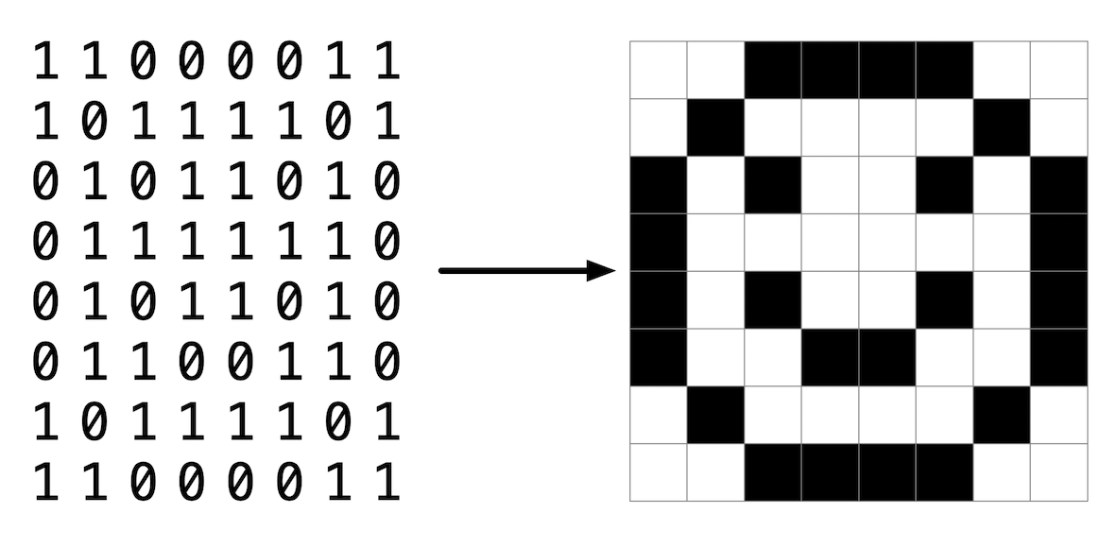
也许最简单的表示图像的方式是使用像素(即点)的网格,每个像素可以有不同的颜色。对于黑白图像,因此每个像素需要1位,0可以代表黑色,1可以代表白色,如下所示。
从这个意义上说,图像只是位图(即位的映射)。对于更丰富多彩的图像,每个像素只需要更多的位。支持“24位色”的文件格式使用每个像素24位。(BMP实际上支持1、4、8、16、24和32位色。)
24位BMP使用8位表示像素颜色中的红色量,8位表示绿色量,8位表示蓝色量。如果你听说过RGB颜色,那就是:红色、绿色、蓝色。
如果BMP中某个像素的R、G和B值分别是十六进制的0xff、0x00和0x00,那么该像素完全是红色的,因为0xff(十进制中的255)意味着“很多红色”,而0x00和0x00分别意味着“没有绿色”和“没有蓝色”。
技术上的位图
回想一下,文件只是按某种方式排列的位序列。那么,24位BMP文件本质上只是位的序列,(几乎)每24位代表某个像素的颜色。但BMP文件还包含一些“元数据”,比如图像的高度和宽度。这些元数据以两个数据结构的形式存储在文件开头,通常被称为“头文件”,不要与C的头文件混淆。(顺便说一下,这些头文件随着时间的推移已经发展。这个问题使用的是微软BMP格式的最新版本,4.0,它首次亮相是在Windows 95中。)
其中第一个头文件,称为BITMAPFILEHEADER,长14字节。(回想一下,1字节等于8位。)第二个头文件,称为BITMAPINFOHEADER,长40字节。紧接着这些头文件之后是实际的位图:字节数组,其中三元组代表像素的颜色。然而,BMP以相反的顺序存储这些三元组(即BGR),先是8位蓝色,然后是8位绿色,再是8位红色。(有些BMP也将整个位图以相反的顺序存储,图像的顶行在BMP文件的末尾。但我们在这个系列的问题中存储BMP,每个位图的顶行在前,底行在后。)换句话说,如果我们将上面的1位笑脸转换为24位笑脸,用红色代替黑色,24位BMP将如下存储这个位图,其中0000ff表示红色,ffffff表示白色;我们用红色突出显示所有0000ff的实例。
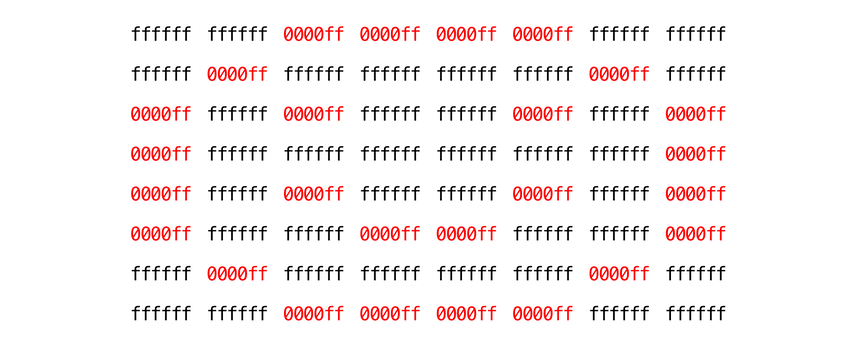
因为我们从左到右、从上到下以8列的方式呈现这些位,你实际上可以退后一步看到红色的笑脸。
为了明确,回想一下,一个十六进制数字代表4位。因此,十六进制中的ffffff实际上在二进制中表示为111111111111111111111111。
注意,你可以将位图表示为像素的二维数组:图像是一个由行组成的数组,每行本身是一个像素数组。事实上,这就是我们在这个系列问题中选择表示位图图像的方式。
BMP头文件
// BMP-related data types based on Microsoft's own

#include <stdint.h>

/**
 * Common Data Types
 *
 * The data types in this section are essentially aliases for C/C++
 * primitive data types.
 *
 * Adapted from http://msdn.microsoft.com/en-us/library/cc230309.aspx.
 * See http://en.wikipedia.org/wiki/Stdint.h for more on stdint.h.
 */
typedef uint8_t  BYTE;
typedef uint32_t DWORD;
typedef int32_t  LONG;
typedef uint16_t WORD;

/**
 * BITMAPFILEHEADER
 *
 * The BITMAPFILEHEADER structure contains information about the type, size,
 * and layout of a file that contains a DIB [device-independent bitmap].
 *
 * Adapted from http://msdn.microsoft.com/en-us/library/dd183374(VS.85).aspx.
 */
typedef struct
{
    WORD   bfType;
    DWORD  bfSize;
    WORD   bfReserved1;
    WORD   bfReserved2;
    DWORD  bfOffBits;
} __attribute__((__packed__))
BITMAPFILEHEADER;

/**
 * BITMAPINFOHEADER
 *
 * The BITMAPINFOHEADER structure contains information about the
 * dimensions and color format of a DIB [device-independent bitmap].
 *
 * Adapted from http://msdn.microsoft.com/en-us/library/dd183376(VS.85).aspx.
 */
typedef struct
{
    DWORD  biSize;
    LONG   biWidth;
    LONG   biHeight;
    WORD   biPlanes;
    WORD   biBitCount;
    DWORD  biCompression;
    DWORD  biSizeImage;
    LONG   biXPelsPerMeter;
    LONG   biYPelsPerMeter;
    DWORD  biClrUsed;
    DWORD  biClrImportant;
} __attribute__((__packed__))
BITMAPINFOHEADER;

/**
 * RGBTRIPLE
 *
 * This structure describes a color consisting of relative intensities of
 * red, green, and blue.
 *
 * Adapted from http://msdn.microsoft.com/en-us/library/aa922590.aspx.
 */
typedef struct
{
    BYTE  rgbtBlue;
    BYTE  rgbtGreen;
    BYTE  rgbtRed;
} __attribute__((__packed__))
RGBTRIPLE;
天蓝色
算法实现
void colorize(int height, int width, RGBTRIPLE image[height][width])
{
    // Change all black pixels to a color of your choosing
    for (int i = 0; i < height; i++)
    {
        for (int j = 0; j < width; j++)
        {
            if (image[i][j].rgbtRed == 0 && image[i][j].rgbtGreen == 0 && image[i][j].rgbtBlue == 0)
            {
                image[i][j].rgbtRed = 135;
                image[i][j].rgbtGreen = 205;
                image[i][j].rgbtBlue = 250;
            }
        }
    }
}
如果真爱有颜色,那一定是蓝色!!!

灰度化
一种常见的过滤器是“灰度”过滤器,我们将图像转换为黑白。这是怎么做的呢?
回想一下,如果红色、绿色和蓝色值都设置为0x00(0的十六进制),那么像素就是黑色的。如果所有值都设置为0xff(255的十六进制),那么像素就是白色的。只要红色、绿色和蓝色值都相等,结果就会是黑色-白色谱上的不同灰度,值越高意味着越浅的色调(更接近白色),值越低意味着更深的色调(更接近黑色)。
因此,要将像素转换为灰度,我们只需要确保红色、绿色和蓝色值都相同。但我们怎么知道要将它们设置为什么值呢?嗯,如果原始的红色、绿色和蓝色值都相当高,那么新值也应该相当高。如果原始值都很低,那么新值也应该很低。
事实上,为了确保新图像的每个像素与旧图像具有相同的一般亮度或暗度,我们可以取红色、绿色和蓝色值的平均值,以确定新像素的灰度。
如果你将这应用到图像的每个像素上,结果将是转换为灰度的图像。
算法实现
// 灰度化
// Convert image to grayscale
void grayscale(int height, int width, RGBTRIPLE image[height][width])
{
    for (int i = 0; i < height; i++)
    {
        for (int j = 0; j < width; j++)
        {
            int red = image[i][j].rgbtRed;
            int green = image[i][j].rgbtGreen;
            int blue = image[i][j].rgbtBlue;
            double average = 0.299 * red + 0.587 * green + 0.114 * blue;
            // double average = (red + green + blue)/3.0;
            image[i][j].rgbtBlue=average;
            image[i][j].rgbtGreen=average;
            image[i][j].rgbtRed=average;
        }

    }

    return;
}

深褐色
大多数图像编辑程序都支持“深褐色”过滤器,它通过使整个图像看起来有点红棕色,赋予图像一种过时的感觉。
通过采取每个像素,并根据原始的三个值计算新的红色、绿色和蓝色值,可以将图像转换为深褐色。
有许多算法可以将图像转换为深褐色,但对于这个问题,我们将要求你使用以下算法。对于每个像素,深褐色颜色值应根据下面的原始颜色值计算。
  sepiaRed = .393 * originalRed + .769 * originalGreen + .189 * originalBlue
  sepiaGreen = .349 * originalRed + .686 * originalGreen + .168 * originalBlue
  sepiaBlue = .272 * originalRed + .534 * originalGreen + .131 * originalBlue
当然,这些公式的结果可能不是整数,但每个值都可以四舍五入到最近的整数。公式的结果也可能是大于255的数字,8位颜色值的最大值。在这种情况下,红色、绿色和蓝色值应该限制在255。因此,我们可以保证结果的红色、绿色和蓝色值是0到255之间的整数。
算法实现
// 棕褐色
// Convert image to sepia
void sepia(int height, int width, RGBTRIPLE image[height][width])
{
    for (int i = 0; i < height; i++)
    {
        for (int j = 0; j < width; j++)
        {
            int originalRed = image[i][j].rgbtRed;
            int originalGreen = image[i][j].rgbtGreen;
            int originalBlue = image[i][j].rgbtBlue;
            int sepiaRed = .393 * originalRed + .769 * originalGreen + .189 * originalBlue;
            int sepiaGreen = .349 * originalRed + .686 * originalGreen + .168 * originalBlue;
            int sepiaBlue = .272 * originalRed + .534 * originalGreen + .131 * originalBlue;
            // 确保颜色值在 0 到 255 之间
            sepiaRed = sepiaRed > 255 ? 255 : (sepiaRed < 0 ? 0 : sepiaRed);
            sepiaGreen = sepiaGreen > 255 ? 255 : (sepiaGreen < 0 ? 0 : sepiaGreen);
            sepiaBlue = sepiaBlue > 255 ? 255 : (sepiaBlue < 0 ? 0 : sepiaBlue);
            image[i][j].rgbtBlue = sepiaBlue;
            image[i][j].rgbtGreen = sepiaGreen;
            image[i][j].rgbtRed = sepiaRed;
        }

    }

    return;
}

水平镜像
请注意,原始图像的所有原始像素仍然会出现在镜像图像中,只是这些像素可能在图像中重新排列到不同的位置。
算法实现
// 水平翻转
// Reflect image horizontally
void reflect(int height, int width, RGBTRIPLE image[height][width])
{
    for (int i = 0; i < height; i++)
    {
        for (int j = 0; j < (width/2); j++)
        {
            RGBTRIPLE temp = image[i][j];
            image[i][j]=image[i][width-j-1];
            image[i][width-j-1] = temp;
        }

    }

    return;
}

小插曲
因为这里使用的文件是bmp文件,所以还写了一个其他格式的文件转换为bmp的c程序,但是总是要么毁损0kb要么就三重影。。。然后搜了搜,python导包后两句代码解决。。。
import cv2

if __name__ == "__main__":
    img = cv2.imread("输入文件名")
    cv2.imwrite("输出文件名", img)

模糊
有许多方法可以创建模糊或软化图像的效果。对于这个问题,我们将使用“盒式模糊”,它通过采取每个像素,并为每个颜色值,通过平均邻近像素的颜色值,给它一个新的值。
考虑以下像素网格,我们已经对每个像素进行了编号。
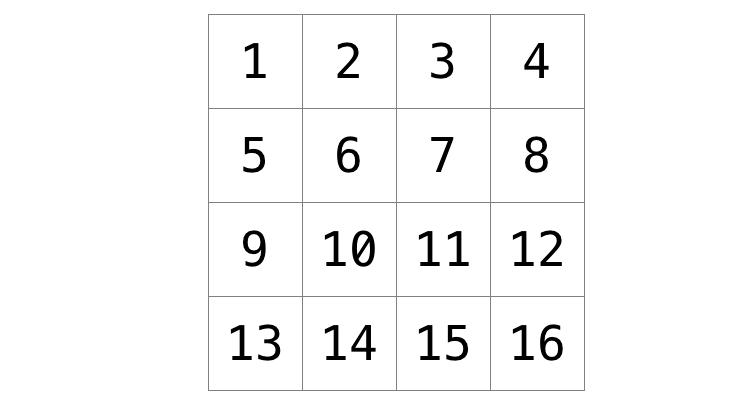
每个像素的新值将是原始像素1行和1列内所有像素值的平均值(形成一个3x3的盒子)。例如,像素6的每种颜色值将通过平均原始颜色值的像素1、2、3、5、6、7、9、10和11获得(注意像素6本身包含在平均值中)。同样,像素11的颜色值将通过平均像素6、7、8、10、11、12、14、15和16的原始颜色值获得。
对于像像素15这样的边缘或角落像素,我们仍然寻找1行和1列内的所有像素:在这种情况下,像素10、11、12、14、15和16。
算法实现
// 模糊
// Blur image
void blur(int height, int width, RGBTRIPLE image[height][width])
{
    RGBTRIPLE temp[height][width];

    for (int i = 0; i < height; i++){
        for (int j = 0; j < width; j++){
            double sumR=0,sumG=0,sumB=0,cnt=0;

            for(int row=-1;row<=1;row++){
                for(int col=-1;col<=1;col++){
                    if((i+row<0)||(i+row>=height)||(j+col<0)||(j+col>=width)) continue;
                    sumR += image[i+row][j+col].rgbtRed;
                    sumG += image[i+row][j+col].rgbtGreen;
                    sumB += image[i+row][j+col].rgbtBlue;
                    cnt++;
                }
            }

            if(cnt>0){
                temp[i][j].rgbtRed = sumR/cnt;
                temp[i][j].rgbtGreen = sumG/cnt;
                temp[i][j].rgbtBlue = sumB/cnt;
            }else{
                temp[i][j]=image[i][j];
            }

        }

    }

    for(int i=0;i<height;i++){
        for(int j=0;j<width;j++){
            image[i][j]=temp[i][j];
        }
    }

    return;
}
不知道为什么同一张到这里就不能正常生成图片,直接0kb,但是用原本的例子又可以正常实现。暂时没搞懂(之后也不一定会去搞清楚)
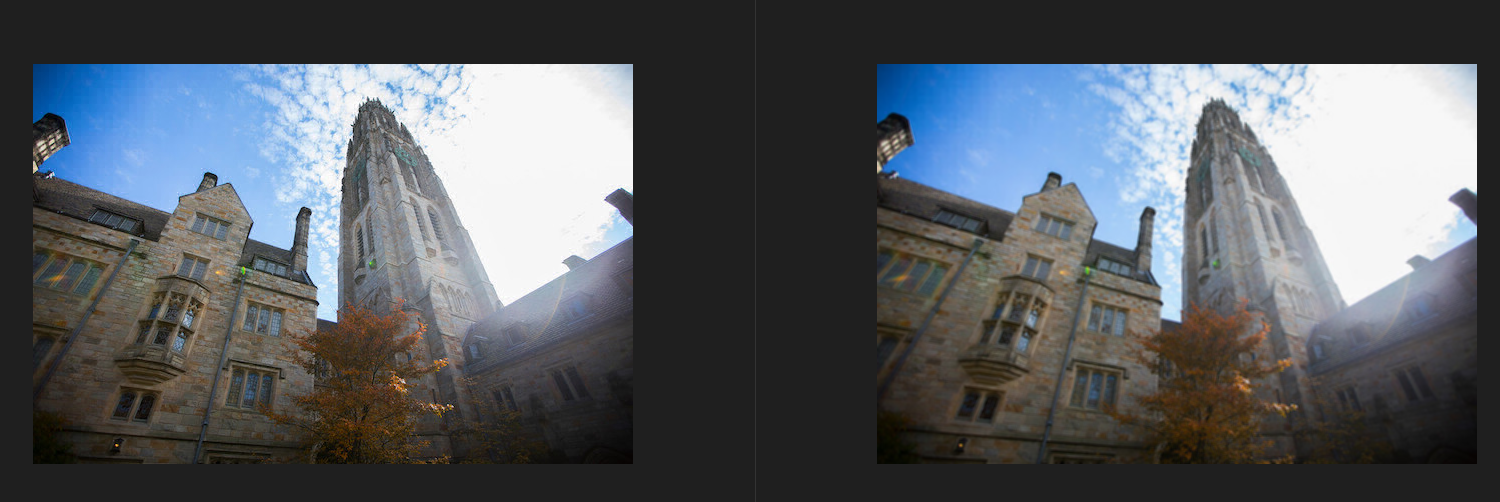
左边原图,右边模糊处理过后
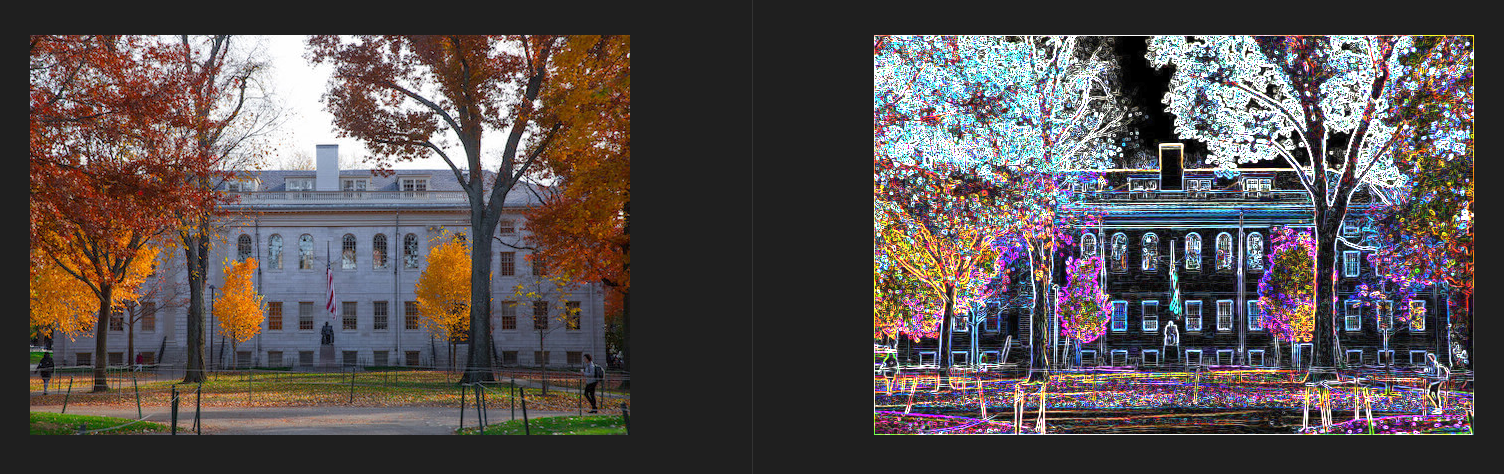
边缘检测
在图像处理的人工智能算法中,经常有助于检测图像中的边缘:在图像中创建一个对象与另一个对象之间的边界的线。实现这种效果的一种方法是对图像应用Sobel算子。
像图像模糊一样,边缘检测也通过采取每个像素,并根据围绕该像素的3x3网格中的像素来修改它。但不仅仅是采取这九个像素的平均值,Sobel算子通过采取周围像素的加权和来计算每个像素的新值。由于物体之间的边缘可能在垂直和水平方向上发生,你实际上会计算两个加权和:一个用于检测x方向上的边缘,一个用于检测y方向上的边缘。特别是,你将使用以下两个“核”:
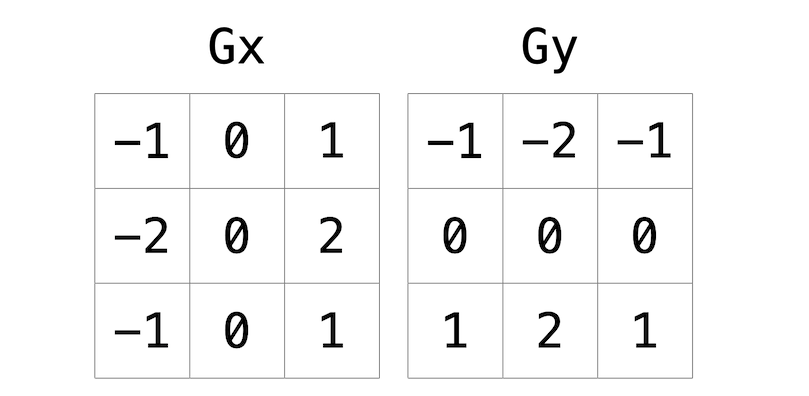
如何解释这些核?简而言之,对于每个像素的三种颜色值,我们将计算两个值Gx和Gy。例如,要计算一个像素的红色通道值的Gx,我们将采取围绕像素的九个像素的原始红色值,将它们每个乘以Gx核中的相应值,并取结果值的总和。
为什么选择这些特定的核值?例如,在Gx方向上,我们将目标像素右侧的像素乘以正数,将目标像素左侧的像素乘以负数。当我们取总和时,如果右侧的像素与左侧的像素颜色相似,结果将接近0(数字抵消)。但如果右侧的像素与左侧的像素非常不同,那么结果值将非常正或非常负,表明颜色的变化很可能是由于物体之间的边界。对于计算y方向上的边缘,也是类似的论点。
使用这些核,我们可以为一个像素的红色、绿色和蓝色通道生成一个Gx和Gy值。但每个通道只能取一个值,而不是两个:所以我们需要某种方式将Gx和Gy合并成一个单一的值。Sobel过滤器算法通过计算Gx^2 + Gy^2的平方根将Gx和Gy合并成最终值。由于通道值只能取0到255的整数值,确保结果值四舍五入到最近的整数,并限制在255以内!
那么如何处理图像边缘或角落的像素呢?处理边缘像素有很多方法,但对于这个问题,我们将要求你将图像视为如果图像边缘有1像素的纯黑色边框:因此,尝试访问图像边缘之外的像素应该被视为纯黑色像素(红色、绿色和蓝色每个的值为0)。这将有效地忽略我们计算Gx和Gy的那些像素。
算法实现
// Detect edges
void edges(int height, int width, RGBTRIPLE image[height][width])
{
    RGBTRIPLE temp[height][width];

    int gx[3][3] = {{-1, 0, 1}, {-2, 0, 2}, {-1, 0, 1}};
    int gy[3][3] = {{-1, -2, -1}, {0, 0, 0}, {1, 2, 1}};

    for (int i = 0; i < height; i++)
    {
        for (int j = 0; j < width; j++)
        {
            int gxBlue = 0;
            int gyBlue = 0;
            int gxGreen = 0;
            int gyGreen = 0;
            int gxRed = 0;
            int gyRed = 0;

            for (int row = -1; row < 2; row++)
            {
                for (int col = -1; col < 2; col++)
                {
                    if (i + row < 0 || i + row >= height)continue;
                    if (j + col < 0 || j + col >= width)continue;

                    gxBlue += image[i + row][j + col].rgbtBlue * gx[row + 1][col + 1];
                    gyBlue += image[i + row][j + col].rgbtBlue * gy[row + 1][col + 1];
                    gxGreen += image[i + row][j + col].rgbtGreen * gx[row + 1][col + 1];
                    gyGreen += image[i + row][j + col].rgbtGreen * gy[row + 1][col + 1];
                    gxRed += image[i + row][j + col].rgbtRed * gx[row + 1][col + 1];
                    gyRed += image[i + row][j + col].rgbtRed * gy[row + 1][col + 1];
                }
            }

            int blue = round(sqrt(gxBlue * gxBlue + gyBlue * gyBlue));
            int green = round(sqrt(gxGreen * gxGreen + gyGreen * gyGreen));
            int red = round(sqrt(gxRed * gxRed + gyRed * gyRed));

            temp[i][j].rgbtBlue = (blue > 255) ? 255 : blue;
            temp[i][j].rgbtGreen = (green > 255) ? 255 : green;
            temp[i][j].rgbtRed = (red > 255) ? 255 : red;
        }
    }

    for (int i = 0; i < height; i++)
    {
        for (int j = 0; j < width; j++)
        {
           image[i][j]=temp[i][j];
        }
    }

    return ;
}
和模糊一样的问题,也是0kb,但是官方给的图片可以正常。。。应该算正常吧?。。。
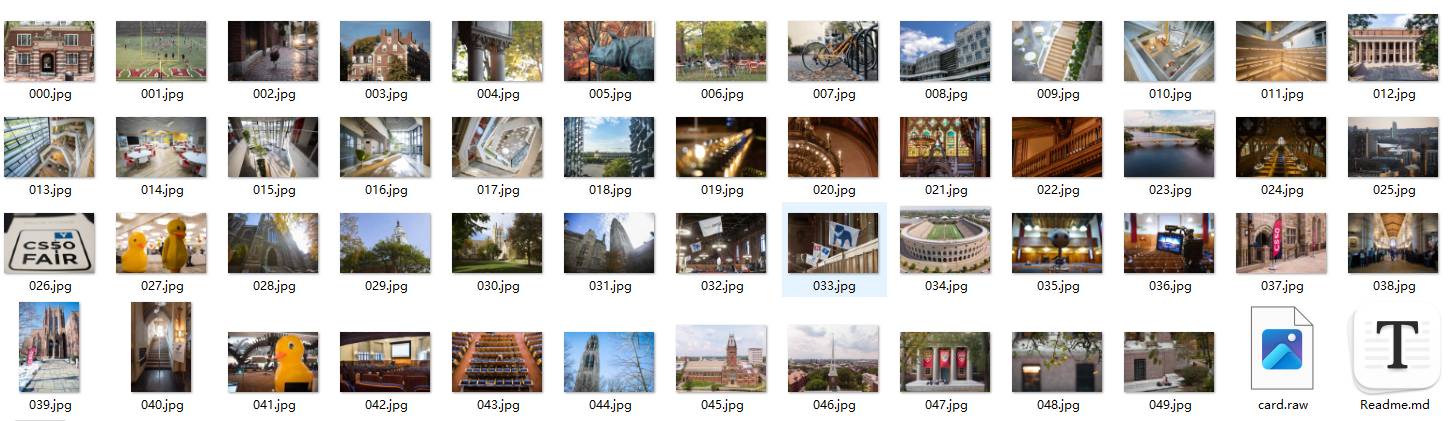
recover
实现一个程序,从取证镜像中恢复JPEG文件
在这个问题之前,我们过去几天在校园里拍了很多照片,都被保存在数字相机的存储卡上作为JPEG格式。不幸的是,我们不知怎么的全部删除了!幸运的是,在计算机世界中,“删除”往往并不意味着“删除”,而更像是“遗忘”。尽管相机坚称存储卡现在是空的,我们非常确定这不是真的。事实上,我们希望(或者说期待!)你能为我们编写一个程序来恢复这些照片!
尽管JPEG比BMP更复杂,但JPEG有“签名”,字节模式可以将其与其他文件格式区分开来。具体来说,JPEG的前三个字节是:
0xff 0xd8 0xff
从第一个字节到第三个字节,从左到右。与此同时,第四个字节可以是 0xe0、0xe1、0xe2、0xe3、0xe4、0xe5、0xe6、0xe7、0xe8、0xe9、0xea、0xeb、0xec、0xed、0xee 或 0xef。换句话说,第四个字节的前四位是 1110。
如果你在已知用于存储照片的媒体上找到了这四个连续的字节模式(例如,我的存储卡),它们就标志着一个JPEG的开始。公平地说,你可能会在某些磁盘上纯粹偶然遇到这些模式,因此数据恢复并不是一门精确的科学。
幸运的是,数码相机倾向于在存储卡上连续存储照片,每张照片都紧随之前拍摄的照片之后存储。因此,一个JPEG的开始通常标志着另一个JPEG的结束。然而,数码相机通常使用FAT文件系统初始化存储卡,其“块大小”是512字节(B)。这意味着这些相机只在512B的单位上写入这些卡。因此,一个1MB(即1,048,576B)的照片在存储卡上占用了1048576 ÷ 512 = 2048个“块”。但即使是一个比它小一个字节(即1,048,575B)的照片也是如此!磁盘上浪费的空间称为“闲置空间”。取证调查人员经常在闲置空间中寻找可疑数据的残余。
所有这些细节的含义是,你,作为调查人员,可能可以编写一个程序,迭代我的存储卡的副本,寻找JPEG的签名。每次你找到一个签名,你可以打开一个新的文件进行写入,并开始用我的存储卡上的字节填充该文件,只有在遇到另一个签名时才关闭该文件。此外,你不必一次读取存储卡上的一个字节,你可以为了效率一次读取512个字节到缓冲区。由于FAT,你可以相信JPEG的签名将是“块对齐”的。也就是说,你只需要在块的前四个字节中寻找这些签名。
当然,JPEG可以跨越连续的块。否则,没有JPEG可以大于512B。但JPEG的最后一个字节可能不会正好落在块的末尾。回想一下闲置空间的可能性。但不用担心。因为这张存储卡在我开始拍照时是全新的,很可能被制造商“清零”(即,用0填充),在这种情况下,任何闲置空间将用0填充。如果你恢复的JPEG中包含了这些尾随的0,那是可以的;它们仍然可以查看。
现在,我只有一张存储卡,但你们有很多!所以我提前创建了一个存储卡的“取证镜像”,将其内容一个字节接一个字节地存储在一个名为card.raw的文件中。为了不让你不必要地迭代数百万个0,我只镜像了存储卡的前几兆字节。但你最终会发现镜像包含50个JPEG。
算法实现
#include <stdio.h>
#include <stdlib.h>
#include <stdint.h>

typedef uint8_t BYTE;

int main(int argc, char *argv[])
{
    if (argc != 2)
    {
        printf("Usage: ./recover IMAGE\n");
        return 1;
    }

    FILE *input = fopen(argv[1], "rb");
    if (input == NULL)
    {
        printf("Could not open file.\n");
        return 1;
    }

    BYTE buffer[512];
    char filename[10];
    int cnt = 0;
    FILE *output = NULL;

    while (fread(buffer, 1, 512, input) == 512){
        if (buffer[0] == 0xff && buffer[1] == 0xd8 && buffer[2] == 0xff && (buffer[3] & 0xf0) == 0xe0)
        {
            if (cnt > 0) fclose(output);

            sprintf(filename, "%03i.jpg", cnt);
            output = fopen(filename, "wb");
            cnt++;
        }

        if(cnt > 0) fwrite(buffer, 1, 512, output);
    }

    fclose(input);
    fclose(output);
    return 0;
}
恢复后
reverse
实现一个程序,按照以下要求反转一个WAV文件。
在Electric Light Orchestra的“Fire on High”中,音乐的前一分钟有点不对劲。如果你仔细听,它听起来就像是音频在倒播。事实证明,如果你将这首歌的开头部分倒过来播放,你会听到以下内容:
“音乐可以反转。时间不可以。回头,回头!”
可怕,对吧?这是一种叫做“倒置录音”的技术,或者在音乐中隐藏信息,只有在歌曲倒播时才能听到。许多艺术家都使用(或被怀疑使用)这种技术在他们的歌曲中。为了能够对我们自己的倒置录音进行调查,我们要求你编写一个程序,可以为我们反转WAV文件!
与MP3音频文件不同,WAV文件是未压缩的。这使得文件更容易编辑和操作,这对于手头的任务非常有用。
WAV头文件
// BMP-related data types based on Microsoft's own

#include <stdint.h>

// These data types are essentially aliases for C/C++ primitive data types.
// Adapted from http://msdn.microsoft.com/en-us/library/cc230309.aspx.
// See https://en.wikipedia.org/wiki/C_data_types#stdint.h for more on stdint.h.

typedef uint8_t   BYTE;
typedef uint16_t  WORD;
typedef uint32_t  DWORD;

// The WAVHEADER structure contains information about the type, size,
// and layout of a file that contains audio samples.
// Adapted from http://soundfile.sapp.org/doc/WaveFormat/.

typedef struct
{
    BYTE   chunkID[4];
    DWORD  chunkSize;
    BYTE   format[4];
    BYTE   subchunk1ID[4];
    DWORD  subchunk1Size;
    WORD   audioFormat;
    WORD   numChannels;
    DWORD  sampleRate;
    DWORD  byteRate;
    WORD   blockAlign;
    WORD   bitsPerSample;
    BYTE   subchunk2ID[4];
    DWORD  subchunk2Size;
} __attribute__((__packed__))
WAVHEADER;
用户能够反转他们给定的WAV文件,并创建一个新的WAV文件,包含反转后的音频。为了简单起见,我们将处理的文件限制为WAV格式。
算法实现
#include <stdint.h>
#include <stdio.h>
#include <stdlib.h>

#include "wav.h"

int check_format(WAVHEADER header);
int get_block_size(WAVHEADER header);

int main(int argc, char *argv[])
{
    // Ensure proper usage
    if (argc != 3)
    {
        printf("Error: usage ./reverse.c <input_file> <output_file>");
        return 1;
    }

    // Open input file for reading
     FILE *inputfile = fopen(argv[1], "rb");
    if (inputfile == NULL)
    {
        printf("Error: can't open file");
        return 1;
    }

    // Read header
    WAVHEADER header;
    fread(&header, sizeof(WAVHEADER), 1, inputfile);


    // Use check_format to ensure WAV format
    if (check_format(header) == 0)
    {
        printf("Error: file type not supported");
        return 1;
    }

    // Open output file for writing
    FILE *outputfile = fopen(argv[2], "wb");
    if (outputfile == NULL)
    {
        return 1;
    }

    // Write header to file
    fwrite(&header, sizeof(WAVHEADER), 1, outputfile);

    // Use get_block_size to calculate size of block
    int block_size = get_block_size(header);

    // Write reversed audio to file
    fseek(inputfile, block_size * -1, SEEK_END);
    while (ftell(inputfile) >= 44)
    {
        BYTE sound_piece[block_size];
        fread(sound_piece, block_size, 1, inputfile);
        fwrite(sound_piece, block_size, 1, outputfile);
        fseek(inputfile, block_size * 2 * -1, SEEK_CUR);
    }

    fclose(inputfile);
    fclose(outputfile);

    return 0;
}

int check_format(WAVHEADER header)
{
    if (header.format[0] == 'W' && header.format[1] == 'A' && header.format[2] == 'V' && header.format[3] == 'E')
    {
        return 1;
    }
    return 0;
}

int get_block_size(WAVHEADER header)
{
    int bytesPerSample = header.bitsPerSample / 8;
    return header.numChannels * bytesPerSample;
}
编译后输入
./reverse input.wav output.wav
即可获得反转后的音频
inheritance
模拟一个家庭成员的血型遗传。
一个人的血型由两个等位基因(即,基因的不同形式)决定。可能的三种等位基因是A、B和O,每个人有两种(可能相同,也可能不同)。孩子的每个父母随机传递他们的两个血型等位基因中的一个给孩子。因此,可能的血型组合有:OO, OA, OB, AO, AA, AB, BO, BA和BB。
例如,如果一个父母血型为AO,另一个父母血型为BB,那么孩子的可能血型将是AB和OB,具体取决于从每个父母那里接收到的等位基因。同样,如果一个父母血型为AO,另一个为OB,那么孩子的可能血型将是AO, OB, AB和OO。
// Simulate genetic inheritance of blood type
#include <stdbool.h>
#include <stdio.h>
#include <stdlib.h>
#include <time.h>
// 建树
// Each person has two parents and two alleles
typedef struct person
{
struct person *parents[2];
char alleles[2];
}
person;
const int GENERATIONS = 3;
const int INDENT_LENGTH = 4;
person *create_family(int generations);
void print_family(person *p, int generation);
void free_family(person *p);
char random_allele();
int main(void)
{
// Seed random number generator
srand(time(0));
// Create a new family with three generations
person *p = create_family(GENERATIONS);
// Print family tree of blood types
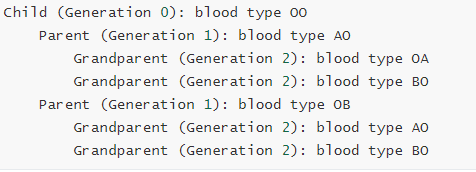
print_family(p, 0);
// Free memory
free_family(p);
}
// Create a new individual with `generations`
person *create_family(int generations)
{
// TODO: Allocate memory for new person
person *new_person = (person*)malloc(sizeof(person*));
// If there are still generations left to create
if (generations > 1)
{
// Create two new parents for current person by recursively calling create_family
person *parent0 = create_family(generations - 1);
person *parent1 = create_family(generations - 1);
// TODO: Set parent pointers for current person
new_person->parents[0] = parent0;
new_person->parents[1] = parent1;
// TODO: Randomly assign current person's alleles based on the alleles of their parents
new_person->alleles[0] = parent0->alleles[rand()%2];
new_person->alleles[1] = parent1->alleles[rand()%2];
}
// If there are no generations left to create
else
{
// TODO: Set parent pointers to NULL
new_person->parents[0] = NULL;
new_person->parents[1] = NULL;
// TODO: Randomly assign alleles
new_person->alleles[0] = random_allele();
new_person->alleles[1] = random_allele();
}
// TODO: Return newly created person
return new_person;
}
// Free `p` and all ancestors of `p`.
void free_family(person *p)
{
// TODO: Handle base case
if (p == NULL)
{
return;
}
// TODO: Free parents recursively
free_family(p->parents[0]);
free_family(p->parents[1]);
// TODO: Free child
free(p);
}
// Print each family member and their alleles.
void print_family(person *p, int generation)
{
// Handle base case
if (p == NULL)
{
return;
}
// Print indentation
for (int i = 0; i < generation * INDENT_LENGTH; i++)
{
printf(" ");
}
// Print person
if (generation == 0)
{
printf("Child (Generation %i): blood type %c%c\n", generation, p->alleles[0], p->alleles[1]);
}
else if (generation == 1)
{
printf("Parent (Generation %i): blood type %c%c\n", generation, p->alleles[0], p->alleles[1]);
}
else
{
for (int i = 0; i < generation - 2; i++)
{
printf("Great-");
}
printf("Grandparent (Generation %i): blood type %c%c\n", generation, p->alleles[0], p->alleles[1]);
}
// Print parents of current generation
print_family(p->parents[0], generation + 1);
print_family(p->parents[1], generation + 1);
}
// Randomly chooses a blood type allele.
char random_allele()
{
int r = rand() % 3;
if (r == 0)
{
return 'A';
}
else if (r == 1)
{
return 'B';
}
else
{
return 'O';
}
}
实际上就是建一个树
speller
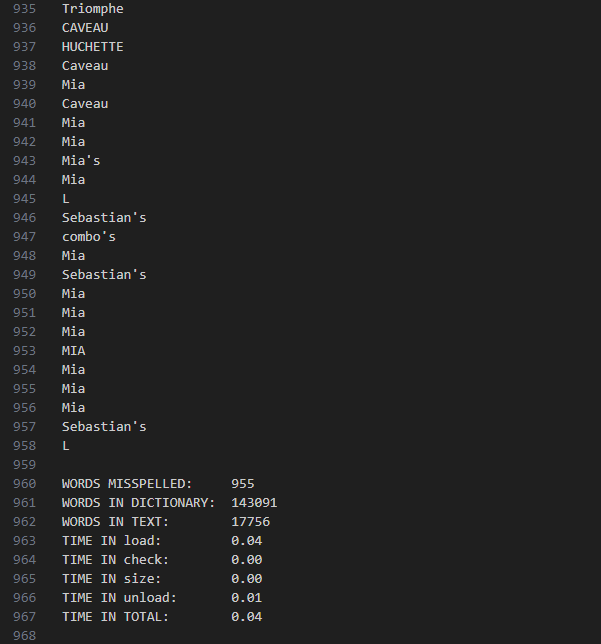
在这个问题中,你将实现一个程序,使用哈希表对文件进行拼写检查
这个实际上就是链表+哈希,主要完成四个函数。但是由于给的speller.c文件使用的计算时间的函数是基于Unix的,而我是在Windows上运行,搞了好一会儿才转换过来。
speller.c
#include <ctype.h>
#include <stdio.h>
#include <time.h>
#include "dictionary.h"

// Default dictionary
#define DICTIONARY "dictionaries/large"

// Prototype
double calculate(clock_t start, clock_t end);

int main(int argc, char *argv[])
{
    // Check for correct number of args
    if (argc != 2 && argc != 3)
    {
        printf("Usage: ./speller [DICTIONARY] text\n");
        return 1;
    }

    // Benchmarks
    double time_load = 0.0, time_check = 0.0, time_size = 0.0, time_unload = 0.0;

    // Determine dictionary to use
    char *dictionary = (argc == 3) ? argv[1] : DICTIONARY;

    // Load dictionary
    clock_t start = clock();
    bool loaded = load(dictionary);
    clock_t end = clock();

    // Exit if dictionary not loaded
    if (!loaded)
    {
        printf("Could not load %s.\n", dictionary);
        return 1;
    }

    // Calculate time to load dictionary
    time_load = calculate(start, end);

    // Try to open text
    char *text = (argc == 3) ? argv[2] : argv[1];
    FILE *file = fopen(text, "r");
    if (file == NULL)
    {
        printf("Could not open %s.\n", text);
        unload();
        return 1;
    }

    // Prepare to report misspellings
    printf("\nMISSPELLED WORDS\n\n");

    // Prepare to spell-check
    int index = 0, misspellings = 0, words = 0;
    char word[LENGTH + 1];

    // Spell-check each word in text
    char c;
    while (fread(&c, sizeof(char), 1, file))
    {
        // Allow only alphabetical characters and apostrophes
        if (isalpha(c) || (c == '\'' && index > 0))
        {
            word[index] = c;
            index++;

            if (index > LENGTH)
            {
                while (fread(&c, sizeof(char), 1, file) && isalpha(c));
                index = 0;
            }
        }
        else if (isdigit(c))
        {
            while (fread(&c, sizeof(char), 1, file) && isalnum(c));
            index = 0;
        }
        else if (index > 0)
        {
            word[index] = '\0';
            words++;

            start = clock();
            bool misspelled = !check(word);
            end = clock();

            time_check += calculate(start, end);

            if (misspelled)
            {
                printf("%s\n", word);
                misspellings++;
            }

            index = 0;
        }
    }

    if (ferror(file))
    {
        fclose(file);
        printf("Error reading %s.\n", text);
        unload();
        return 1;
    }

    fclose(file);

    // Determine dictionary's size
    start = clock();
    unsigned int n = size();
    end = clock();
    time_size = calculate(start, end);

    // Unload dictionary
    start = clock();
    bool unloaded = unload();
    end = clock();

    if (!unloaded)
    {
        printf("Could not unload %s.\n", dictionary);
        return 1;
    }

    time_unload = calculate(start, end);

    // Report benchmarks
    printf("\nWORDS MISSPELLED:     %d\n", misspellings);
    printf("WORDS IN DICTIONARY:  %d\n", n);
    printf("WORDS IN TEXT:        %d\n", words);
    printf("TIME IN load:         %.2f\n", time_load);
    printf("TIME IN check:        %.2f\n", time_check);
    printf("TIME IN size:         %.2f\n", time_size);
    printf("TIME IN unload:       %.2f\n", time_unload);
    printf("TIME IN TOTAL:        %.2f\n\n",
           time_load + time_check + time_size + time_unload);

    // Success
    return 0;
}

// Returns number of seconds between start and end
double calculate(clock_t start, clock_t end)
{
    return ((double)(end - start)) / CLOCKS_PER_SEC;
}
dictionary.c
// Implements a dictionary's functionality
#include <stdio.h>
#include <stdlib.h>
#include <string.h>

#include <ctype.h>

#include "dictionary.h"

// 读文件暂存到链表中,load就是读文件构建链表,unload就是释放链表
// 链表+哈希

// Represents a node in a hash table
typedef struct node
{
    char word[LENGTH + 1];
    struct node *next;
}
node;

// Choose number of buckets in hash table
#define N 100005

int loaded_size = 0;
// Hash table
node *table[N];

// Returns true if word is in dictionary, else false
bool check(const char *word)
{
    for (node *tmp = table[hash(word)]; tmp != NULL; tmp = tmp->next)
    {
        // Your implementation of check must be case-insensitive.
        if (strcasecmp(word, tmp->word) == 0) // 找到返回真
        {
            return true;
        }
    }
    return false;
}

// Hashes word to a number
unsigned int hash(const char *word)
{
    unsigned long long int hash = 0;
    unsigned long long int prime = 131;

    for (int i = 0; i < strlen(word); i++) {
        hash = (hash * prime + tolower(word[i])) % N;
    }

    return (unsigned int)hash;
}

// Loads dictionary into memory, returning true if successful, else false
bool load(const char *dictionary)
{
     FILE *file = fopen(dictionary, "rb");
    if (file == NULL) return false;

    char word[LENGTH + 1];

    while (fscanf(file, "%s", word) != EOF)
    {
        node *n = malloc(sizeof(node));
        if (n == NULL) return false;

        strcpy(n->word, word);
        n->next = table[hash(word)];
        table[hash(word)] = n;
        loaded_size++;
    }

    fclose(file);
    return true;
}

// Returns number of words in dictionary if loaded, else 0 if not yet loaded
unsigned int size(void)
{
    return loaded_size;
}

// Unloads dictionary from memory, returning true if successful, else false
bool unload(void)
{
    for (int i = 0; i < N; i++)
    {
        node *n = table[i];

        while (n != NULL)
        {
            node *tmp = n;
            n = n->next;
            free(tmp);
        }

        if (n == NULL && i == N - 1) return true;
    }
    return false;
}
写在最后
自学路上,唯有坚持
这一切,没有学分,没有绩点,没有老师,没有同学
没有DDL是一件很可怕的事
但要坚定信念–你在变强
如果对其中的程序感兴趣,而中途又缺乏什么资料的话,可以去这里获取。